This post may contain affiliate links which means I may receive a commission for purchases made through links. Learn more on my Private Policy page.
Are you ready to embark on your journey of starting seeds for your garden, but not sure where to begin? Look no further! In this article, you will learn the essential steps on how to create a seed starting schedule. A well-planned schedule is key to ensure that your seeds have the best chance of success, and by following these simple guidelines, you’ll be well on your way to a thriving garden in no time! So grab your notebook and let’s get started on this exciting adventure of seed starting.
Choosing the Right Seeds
Decide on the Type of Seeds
When choosing the right seeds for your garden, consider the types of plants you want to grow. Are you looking to cultivate vegetables, flowers, or herbs? Each plant has its own unique requirements, so it’s important to choose seeds that align with your gardening goals. Take into account factors such as growth habits, size, and maintenance needs. Once you have a clear idea of the type of plants you want to grow, you’re ready to move to the next step.
Consider Your Growing Zone
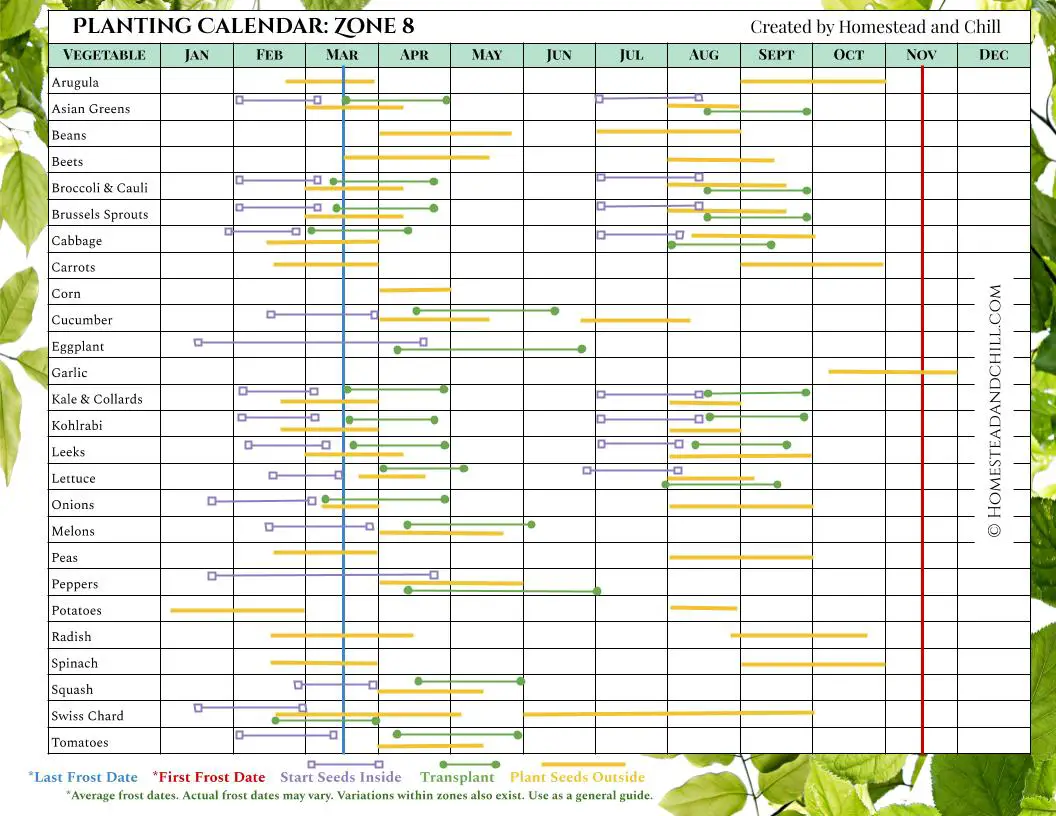
Understanding your growing zone is crucial in determining which seeds will thrive in your specific climate. The United States Department of Agriculture (USDA) has developed a plant hardiness zone map that divides the country into different regions based on average winter temperatures. By finding out which zone you’re in, you can select seeds that are suitable for your location’s climate. This will help ensure that your plants have the best chance of success and won’t be affected by extreme temperatures.
Selecting High-Quality Seeds
Investing in high-quality seeds is essential for a successful gardening experience. Look for seeds that are fresh, well-packaged, and from a reputable supplier. While it may be tempting to save money by opting for cheaper options, it’s important to prioritize quality. High-quality seeds are more likely to have a higher germination rate, meaning that you’ll have a better chance of your seeds sprouting and growing into healthy plants. Additionally, reliable suppliers often provide detailed information about the seeds, including their origin and specific growing instructions.
Determining the Starting Date
Knowing the Last Frost Date
Knowing the last frost date in your area is crucial for determining when to start your seeds. The last frost date is the average date in spring where the risk of frost is significantly reduced. Consult your local gardening resources or use online tools to find out the approximate last frost date for your region. This information will serve as a starting point for planning your seed starting schedule.
Calculating Planting Days
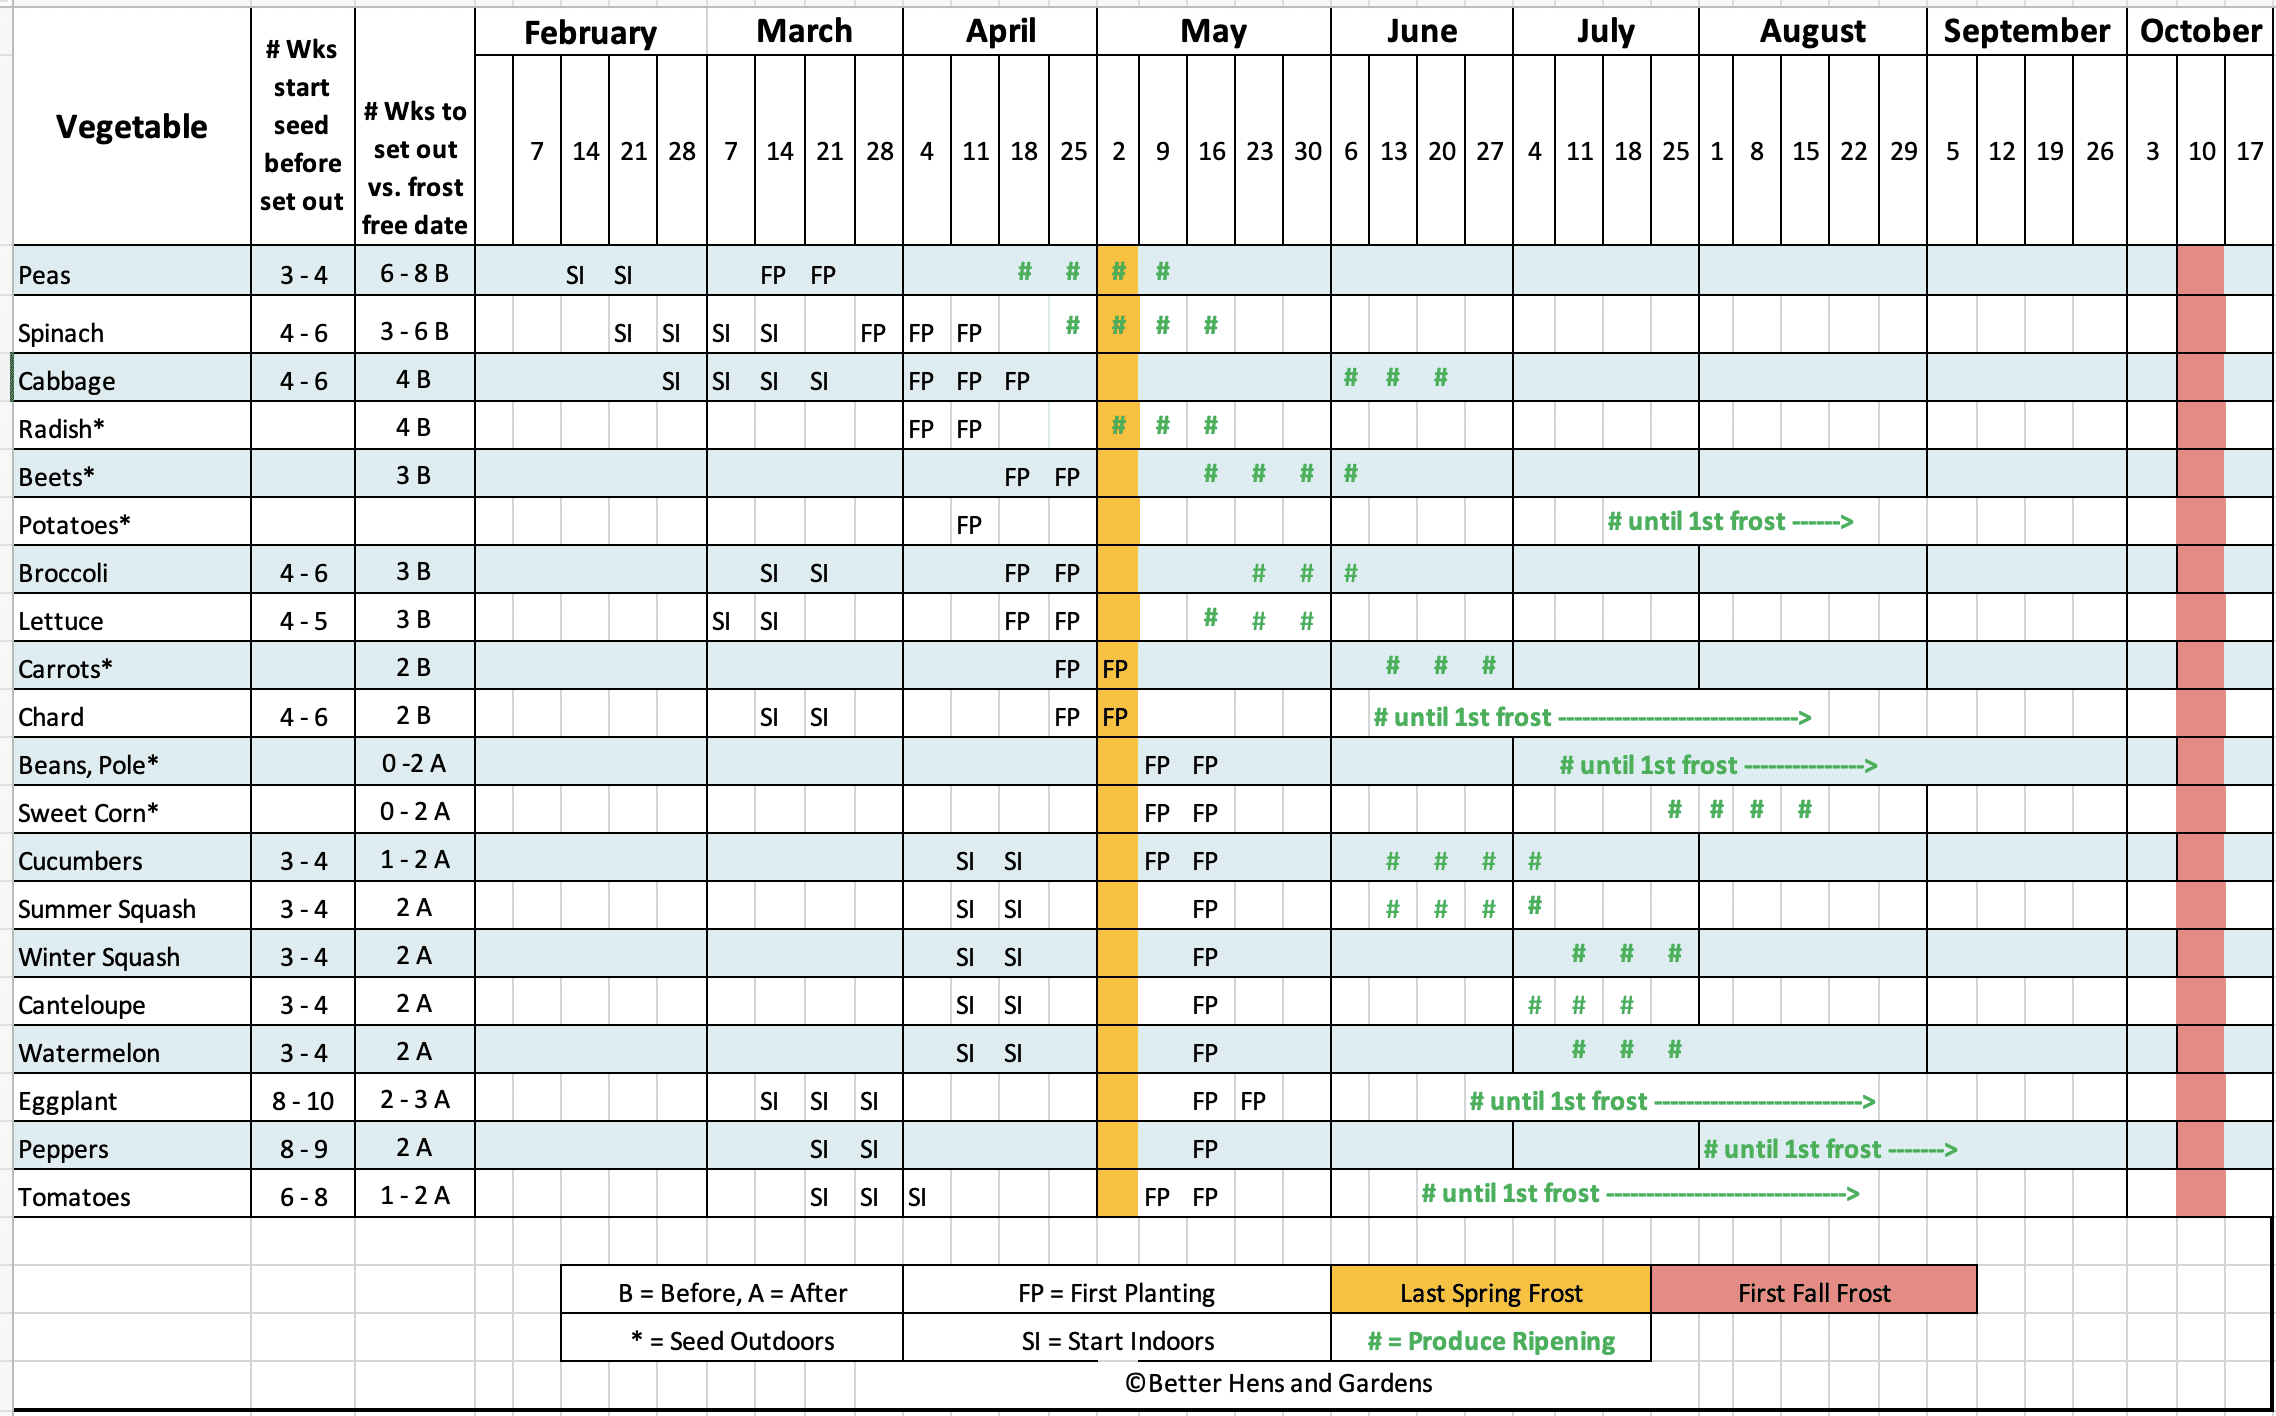
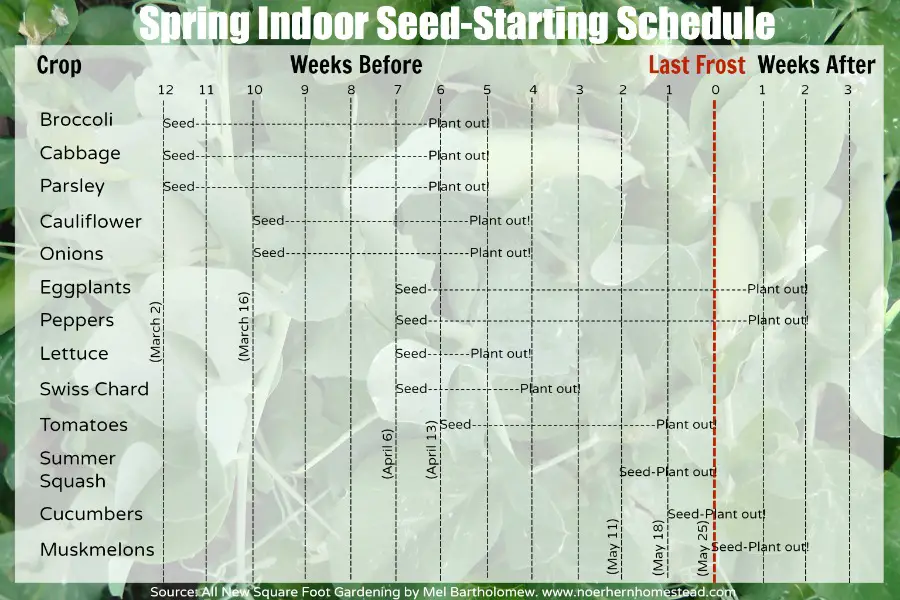
Once you know the last frost date, you can calculate the number of planting days you have until then. Planting days refer to the period between starting your seeds indoors and transplanting them outdoors. Different plants have different recommended planting days, so it’s important to consider the specific requirements of the seeds you’ve chosen. This will help you determine when to start your seeds and ensure that they are at the optimal stage for transplanting when the time comes.
Considering Seed Germination Time
Every plant species has its own germination time, which refers to the period from sowing the seeds to when they start to sprout. This information is typically provided by seed suppliers and can vary significantly depending on the plant. Some seeds may germinate within a few days, while others can take several weeks. Take this into account when planning your seed starting schedule, as it will influence the timing of when you should sow your seeds.
Preparing Your Seed Starting Area
Cleaning and Disinfecting Containers
Before starting your seeds, it’s important to ensure that your containers are clean and free from any potential contaminants. Thoroughly wash your containers with warm, soapy water to remove any dirt or residue. After washing, disinfect the containers by soaking them in a solution of one part bleach to nine parts water for at least ten minutes. Rinse the containers thoroughly afterward to remove any remaining bleach. This step helps prevent diseases and ensures a healthy start for your seedlings.
Selecting the Right Soil Mix
Choosing the right soil mix is essential for seed starting success. Use a high-quality seed starting mix, which is lighter and more sterile than regular garden soil. Seed starting mixes allow for excellent drainage and provide a suitable growing environment for young seedlings. Avoid using soil from your garden, as it may contain pests, diseases, or weed seeds that can hinder seedling growth. Fill your containers with the seed starting mix, leaving a small amount of space at the top to allow for watering.
Setting Up Proper Lighting
Proper lighting is crucial for seedling development, as it promotes healthy growth and prevents plants from becoming leggy or weak. Place your seed starting area near a south-facing window where your seedlings can receive ample sunlight. However, if natural light is limited, consider investing in fluorescent or LED grow lights. Position the lights about two to four inches above the seedlings and adjust the height as they grow. Aim to provide the seedlings with 14-16 hours of light each day to simulate optimal growing conditions.
Creating a Seed Starting Calendar
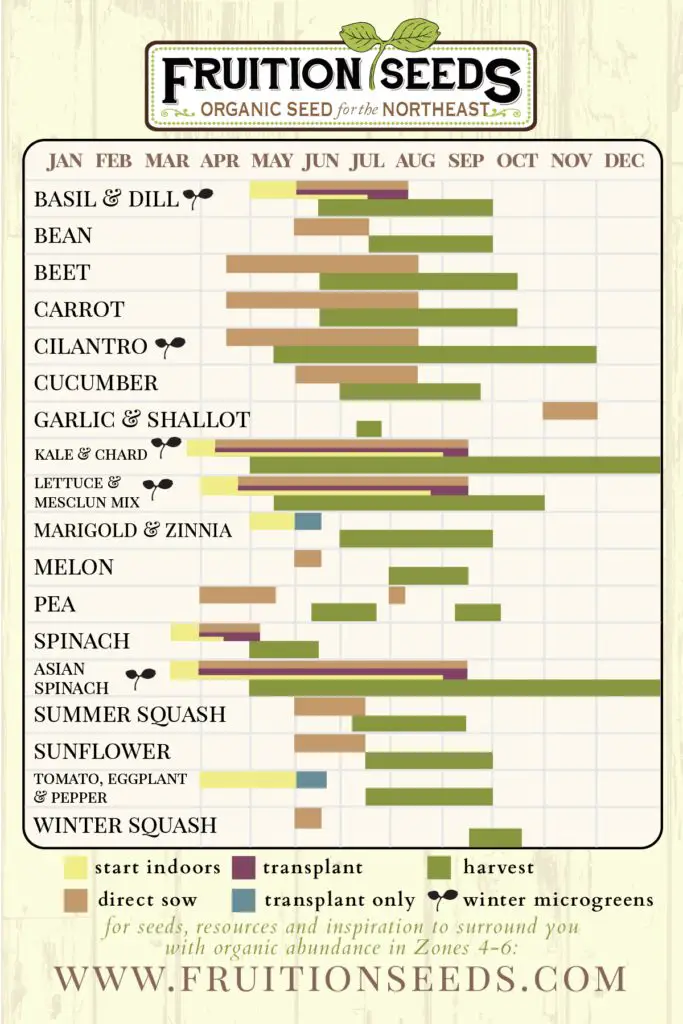
Setting Up a Calendar or Spreadsheet
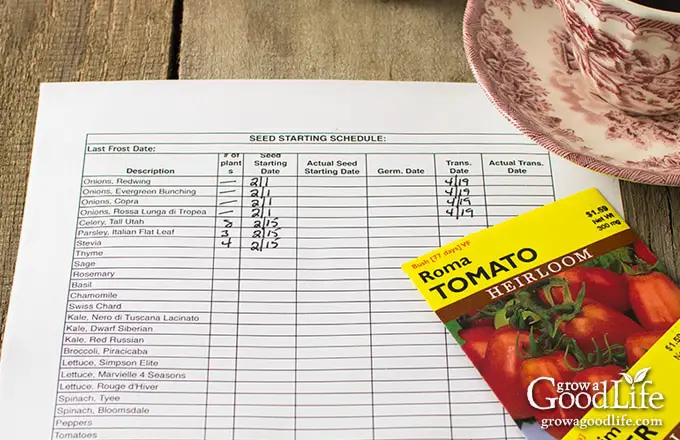
Creating a seed starting calendar will help you stay organized and ensure that you start your seeds at the right time. You can use a traditional calendar or set up a digital spreadsheet to keep track of your schedule. Having a visual representation of your planting dates allows you to easily reference and make adjustments as needed. Mark important dates such as your last frost date, planting days, and estimated germination times.
Transferring Important Dates
Once you have your calendar set up, transfer the important dates from your research. This includes the last frost date, planting days, and estimated germination times for each type of seed you’ll be starting. By having all the information in one place, you can easily refer to it and ensure that you’re on track with your seed starting schedule.
Organizing Succession Planting
Succession planting involves staggering your seed starting to ensure a continuous harvest throughout the growing season. This technique is especially useful for crops that have a relatively short harvest window, such as salad greens or radishes. By planning multiple rounds of seed starting, you can enjoy a steady supply of fresh produce. Take note of the recommended planting intervals for each crop, and organize your seed starting schedule to accommodate successive plantings.
Starting Seeds Indoors
Gathering Supplies
Before starting your seeds, gather all the necessary supplies to ensure a smooth and successful process. This includes containers, seed starting mix, seeds, labels, a watering can or spray bottle, and a planting tool. Having everything prepared and within reach will save time and make your seed starting experience more enjoyable.
Sowing Seeds in Containers
Start by filling your clean and prepared containers with the seed starting mix, leaving about half an inch of space at the top. Follow the specific instructions provided by the seed supplier for planting depth, as it can vary for different seeds. Place a few seeds in each container, ensuring that they are evenly spaced. Gently press the seeds into the soil, taking care not to bury them too deeply. Once the seeds are sown, lightly water the containers to provide moisture for germination.
Providing Optimal Growing Conditions
To promote seed germination and healthy seedling growth, provide optimal growing conditions for your seeds. Keep the containers in a warm area, ideally around 70-75°F (21-24°C). You can use a seedling heat mat to maintain a consistent temperature if needed. Regularly check the moisture level of the soil and water as necessary to keep the soil evenly moist but not waterlogged. Monitor your seedlings for any signs of nutrient deficiencies, pests, or diseases, and take appropriate action.
Monitoring Seed Germination
Checking for Seed Germination
After sowing your seeds, monitor them regularly for signs of germination. Different seeds have different germination times, so be patient and refer back to the estimated germination times for guidance. As soon as you see the first sprouts emerging from the soil, your seeds have germinated successfully. Celebrate this milestone and continue providing the seedlings with the care they need to thrive.
Adjusting Conditions if Necessary
If your seeds are not germinating within the estimated time frame, adjustments may be needed. Check the soil moisture levels to ensure they are not too wet or too dry, as improper moisture can hinder germination. If the temperature is consistently below the recommended range, consider using a seedling heat mat or moving the containers to a warmer location. Take note of any factors that may be affecting germination and make appropriate changes to optimize the growing conditions.
Keeping Track of Seedling Progress
As your seedlings continue to grow, it’s important to monitor their progress. Observe their overall growth rate, leaf color, and stem thickness. Note any changes in their appearance or behavior, as this could be an indication of potential issues or deficiencies. Regularly record your observations and make adjustments to your care routine accordingly. By maintaining a close eye on your seedlings, you can ensure that they are growing healthy and are ready for the next stage of their journey.
Hardening Off Seedlings
Introduction to Outdoor Conditions
Before transitioning your seedlings from the controlled indoor environment to the outdoor garden, they need to be gradually introduced to the outdoor conditions. This process is called hardening off and helps the seedlings acclimate to the changes in temperature, sunlight, and wind. Begin by placing your seedlings in a sheltered spot outdoors for a few hours each day, gradually increasing the exposure time over the course of a week or two. This gradual exposure prepares the seedlings for the harsher conditions they will encounter in the garden.
Gradually Exposing Seedlings
During the hardening off process, gradually expose your seedlings to the elements over a span of 7-14 days. Start with a few hours of morning or late afternoon sunlight, avoiding the intense midday sun. Increase the time and intensity of exposure each day, eventually exposing the seedlings to a full day of sun and wind. Keep an eye on the weather forecast and protect the seedlings from any sudden temperature drops or adverse conditions.
Protecting Seedlings from Stress
While hardening off your seedlings, it’s important to protect them from excessive stress. Sudden changes in temperature, strong winds, or heavy rainfall can be detrimental to the delicate seedlings. Monitor the weather forecast closely and bring the seedlings indoors or provide temporary protection if necessary. Gradually acclimating the seedlings to outdoor conditions while ensuring their safety will greatly increase their chances of surviving and thriving in the garden.
Direct Sowing Seeds
Choosing Suitable Planting Areas
Direct sowing refers to planting seeds directly into the ground instead of starting them indoors. Certain plants, such as root vegetables or fast-growing annuals, prefer to be directly sown outdoors. When selecting suitable planting areas, consider factors such as sunlight exposure, soil fertility, and drainage. Each plant has its own specific growing requirements, so be sure to choose areas that can provide the optimal conditions for successful growth.
Preparing the Soil
Before sowing your seeds, it’s important to prepare the soil to create a favorable environment for germination and growth. Remove any weeds or debris from the planting area and loosen the soil using a garden fork or tiller. Incorporate organic matter or compost into the soil to improve fertility and drainage. Rake the soil surface to create a smooth and even bed for sowing the seeds. Follow the specific planting instructions for seed depth and spacing, as these can vary depending on the plant.
Sowing Seeds in the Ground
Once the soil is prepared, it’s time to sow the seeds directly into the ground. Dig small furrows or holes according to the seed depth instructions, ensuring that the spacing between seeds is appropriate for the specific plant. Place the seeds in the furrows or holes, cover them with soil, and gently press down to ensure good seed-to-soil contact. Water the area thoroughly after sowing to provide moisture for germination. Throughout the growing season, monitor the seedlings’ progress and provide care as needed.
Transplanting Seedlings
Evaluating Seedling Readiness
Transplanting seedlings into the garden should be done when they are strong enough to withstand the outdoor conditions. Evaluate the seedlings’ readiness by considering their size, leaf development, and overall vigor. Typically, seedlings should have at least two to three sets of true leaves and a sturdy stem before being transplanted. If the seedlings appear weak or are struggling to thrive, it may be best to delay transplanting until they are stronger.
Preparing Transplant Containers
Before transplanting your seedlings, prepare the transplant containers where they will temporarily reside. These containers can be peat pots, individual cups, or cell trays. Fill the containers with a suitable potting mix, ensuring they are moistened beforehand. Make a small hole or depression in the center of each container to accommodate the seedlings.
Transplanting Seedlings into the Garden
When the seedlings are ready for transplanting, choose a cloudy day or late afternoon to minimize stress. Dig a hole in the garden bed that is slightly larger than the size of the transplant container. Carefully remove the seedling from its container, gently teasing out the roots if they are tightly packed. Place the seedling in the hole, making sure that the top of the root ball is level with the soil surface. Backfill the hole with soil, gently firming it around the seedling. Water the transplanted seedlings thoroughly to provide initial moisture and help them settle into their new home.
Maintaining a Seed Starting Schedule
Regularly Reviewing the Calendar
To ensure a successful seed starting schedule, it’s important to regularly review and update your calendar. As the gardening season progresses, circumstances may change, and adjustments may be needed. Take time to assess the progress of your seedlings, evaluate the growth of transplanted plants, and make note of any observations or learnings. By staying up to date with your calendar, you’ll be able to identify any necessary changes and make alterations accordingly.
Making Adjustments when Necessary
Throughout the gardening season, be prepared to make adjustments to your seed starting schedule as needed. Unforeseen circumstances such as unfavorable weather, pest infestations, or disease outbreaks can impact the growth and development of your plants. Stay vigilant and take proactive measures to address any challenges that arise. This may involve resowing seeds, adjusting planting times, or implementing pest control strategies. Being adaptable and flexible will help you overcome obstacles and maintain a successful seed starting schedule.
Recording Observations and Learnings
Maintaining a record of your observations and learnings throughout the seed starting process is incredibly valuable. Take notes on the performance of different seed varieties, any challenges you encountered, and the overall success of your garden. This information will serve as a reference for future planting seasons and help you make informed decisions. By reflecting on your experiences, you can continually improve your seed starting skills and achieve your gardening goals.
By following these steps and taking the time to create a comprehensive seed starting schedule, you’ll be well on your way to a successful garden filled with healthy, thriving plants. Remember to customize your schedule based on your specific growing zone, the type of seeds you choose, and the unique requirements of each plant. Happy seed starting!
This post may contain affiliate links which means I may receive a commission for purchases made through links. Learn more on my Private Policy page.

